With Magic links, you can give your clients quick access to portals, even if they are closed to the outside world.
There are several options for creating magic links, which we will explain in this guide.
Generating a link when entering the portal #
When you create an invitation to an organization, you can invite it to the portal right away. To do this, select the desired portal.

After successfully sending the invite, your client will receive an email with a link for quick access to the portal.

When you click on Open portal:
- An account will be automatically created in the organization for this email (if there was no account yet);
- The user will be added to the organization with the selected role;
- The user will get access to the portal and in the future the user can use this link for quick access to the portal.
The user will also be able to login to their Fusebase account via email. The user will be able to get the password for access through the Restore Password option.
Requesting portal access without a Fusebase account #
If a user without an account opens a closed portal, he sees the following message.

If desired, the user can enter his email into the input and click Send access link.

If the user already has access to the portal, he will see the appropriate message and a link for quick access to the portal will be sent to his email.

If the email does not have access to the portal, there will be an error message.

Next, the email of the owner of the organization will receive a message that the new user has requested access to the portal and the owner can manually give access to the portal.
Manual magic link generation for users #
Also, you can manually generate a link for quick access to the portal for existing users.
1) Open the business console – https://teams.nimbusweb.me/
2) In the list of projects, click on the desired one, where there is a portal.

3) In the desired member’s menu, select Generate new magic link for portal.

4) As a result, the link will be sent to the user’s email and copied to the clipboard.
Managing a magic link #
Through the user menu in the portal project, you can also manage the link in a basic way.
Deactivating the link #
You can disable the link for individual users through the Deactivate option.

After that, the link will become inactive and the user will not be able to use it to access the portal.
Generating a new link #
There may be a case where you want to delete the old link and immediately generate a new one. To do this, use the Generate new magic link option.

After that, a new link will be generated and the old one will become inactive and the user will not be able to use it to access the portal.
Magic Links with Additional Security #
You can add additional security to your Magic link. Just create a key to your portal that will be requested after a user clicks on the Magic link.
How to add a key #
- Go to the Organization Console – https://teams.nimbusweb.me/
- Go to the desired workspace with a portal with the Magic link activated.
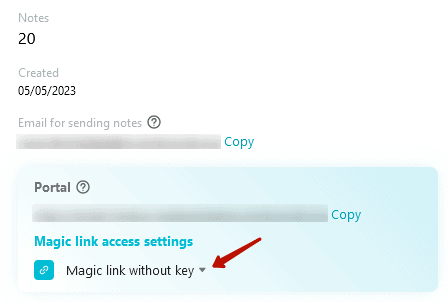
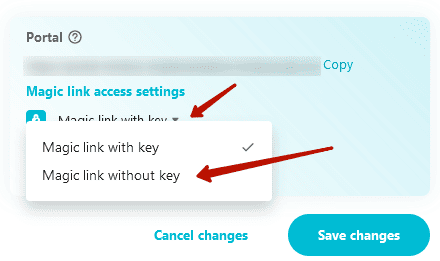
- Click on the arrow next to the Magic link without key.
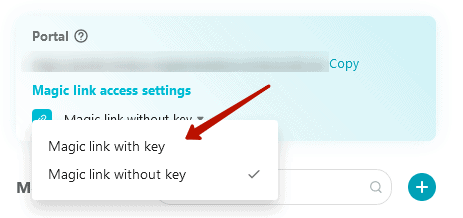
- Select Magic link with key.
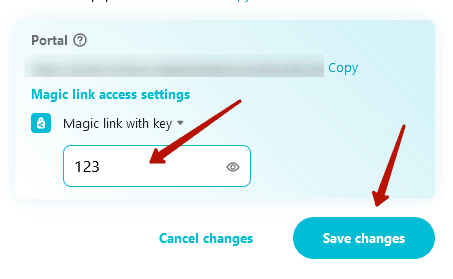
- Enter the desired key and click Save changes.
How to change the key #
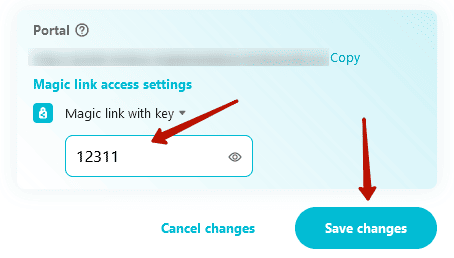
To change the key, open the project settings again and enter the new value. Don’t forget to save it afterward.
How to disable the key #
To disable the key, click on the arrow again, select Magic link without key and Save changes.
Authorization via email/password #
You can also allow your visitors to authenticate to the portal by entering their email and password. To do this, you need to:
1) Go to the Business Console – https://teams.nimbusweb.me.
2) Go to the workspace with the desired portal.
3) Enable the Login with email and password option:

Unified Link for Multi-Portals #
For example, if you have 10 clients and you’ve created 10 portals for them, you may want to provide them with a quick way to access their specific portal, such as through your website or a link in an email newsletter. This can be easily achieved using the Unified Link.
1) Go to your organization’s business console – https://teams.nimbusweb.me
2) In the organization settings, activate the switcher “Enable unified portal link.”

3) Copy the link

You can place this link on your website or include it in your email campaigns. When clients click on the link, they will be redirected to their respective portal.