Our agents not only allow you to search the Internet, your knowledge base, or generate new content, but also fully integrate with the services you use. This way, our agents become a true personal intelligent assistant, enabling you to easily automate your everyday tasks.
For example, you can send research results to Slack, book meetings in your calendar, create invoices in Stripe, and much more. And all of this without complex interfaces or configurations. You simply give a command, and our agent understands and executes it. Integrations are implemented through a new innovative protocol – MCP (Model Context Protocol).
What is MCP? #
MCP is a special “language” that helps AI agents talk to other services like Google Calendar, Airtable, or Stripe.
Why is it useful for you?
- You don’t need to open 10 different apps — your AI agent can do it for you.
- Just tell the agent what you want: “Book a meeting,” “Send this to Slack,”, “Make an invoice” or “Create a task”.
- The agent understands and takes action right away.
In short: MCP makes AI agent smarter — it can not only answer questions, but also do things for you.
Connecting Integrations to Your Agent #
Once you’ve created an agent, you can connect it to the service integration you need. Let’s start with a bit of terminology:
Integration – these are the services you connect, such as Google Drive, Slack, or Airtable.
Tool – this is a part of the integration or a specific action the integration performs. For example, creating a calendar event, sending a message to a Slack channel, or creating a new table are all tools from different integrations. Tools are important for controlling your agents – for instance, you can allow an agent to create tables in Airtable but forbid it from modifying or deleting rows in databases.
In FuseBase, you can choose from existing integrations or add your own by entering the MCP server address (we’ll show you how to do that below). You can also contact our support team if you need a custom integration – https://thefusebase.com/support/
Now let’s connect a ready-made integration to your agent. For example, let’s connect Google Calendar.
1) Go to edit your agent and click on the Integrations tab.
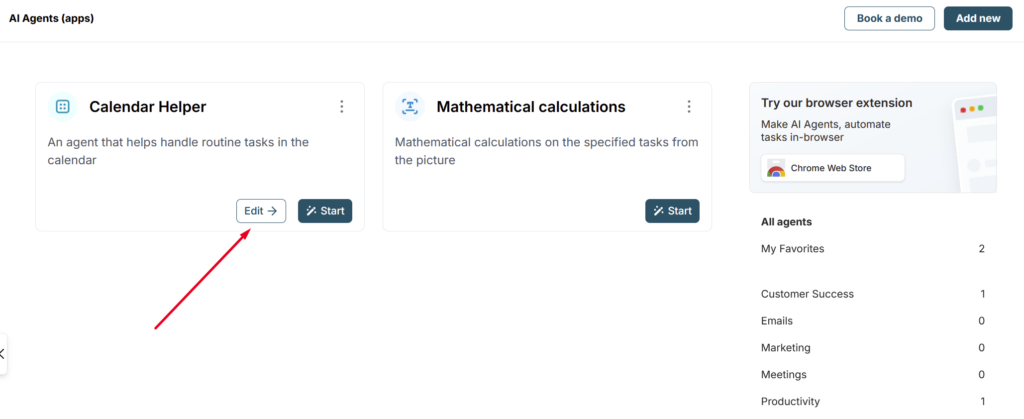

2) Find Google Calendar in the list.
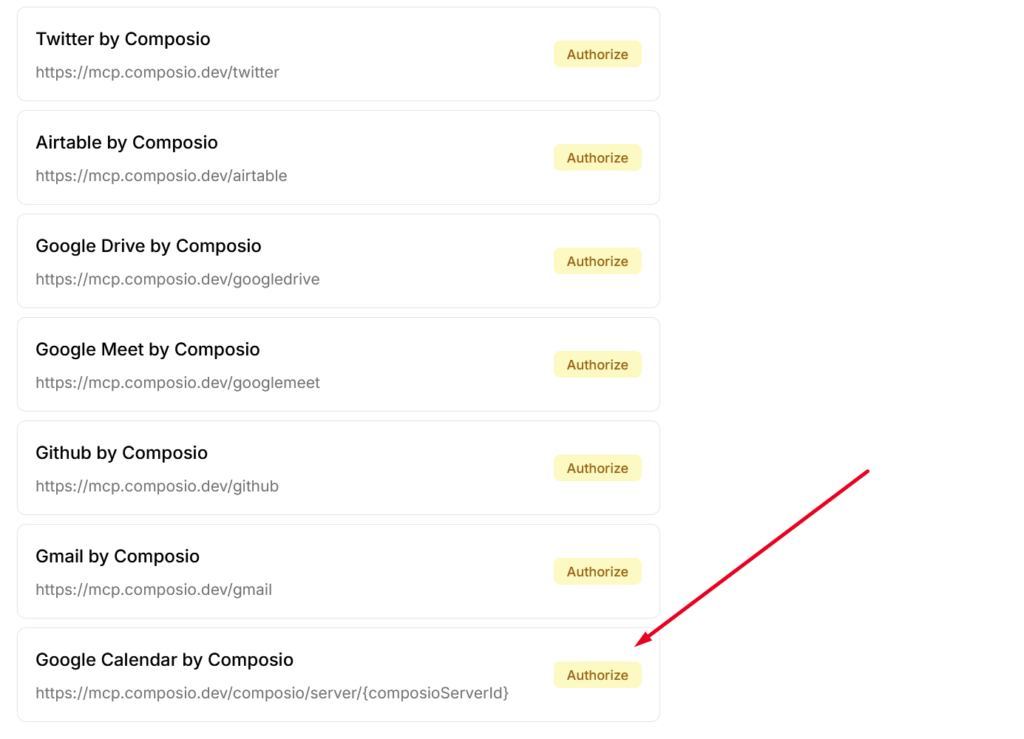
3) Click Authorize/Connect and sign in to your Google account (don’t worry – it’s safe, and our service does not access your personal data).
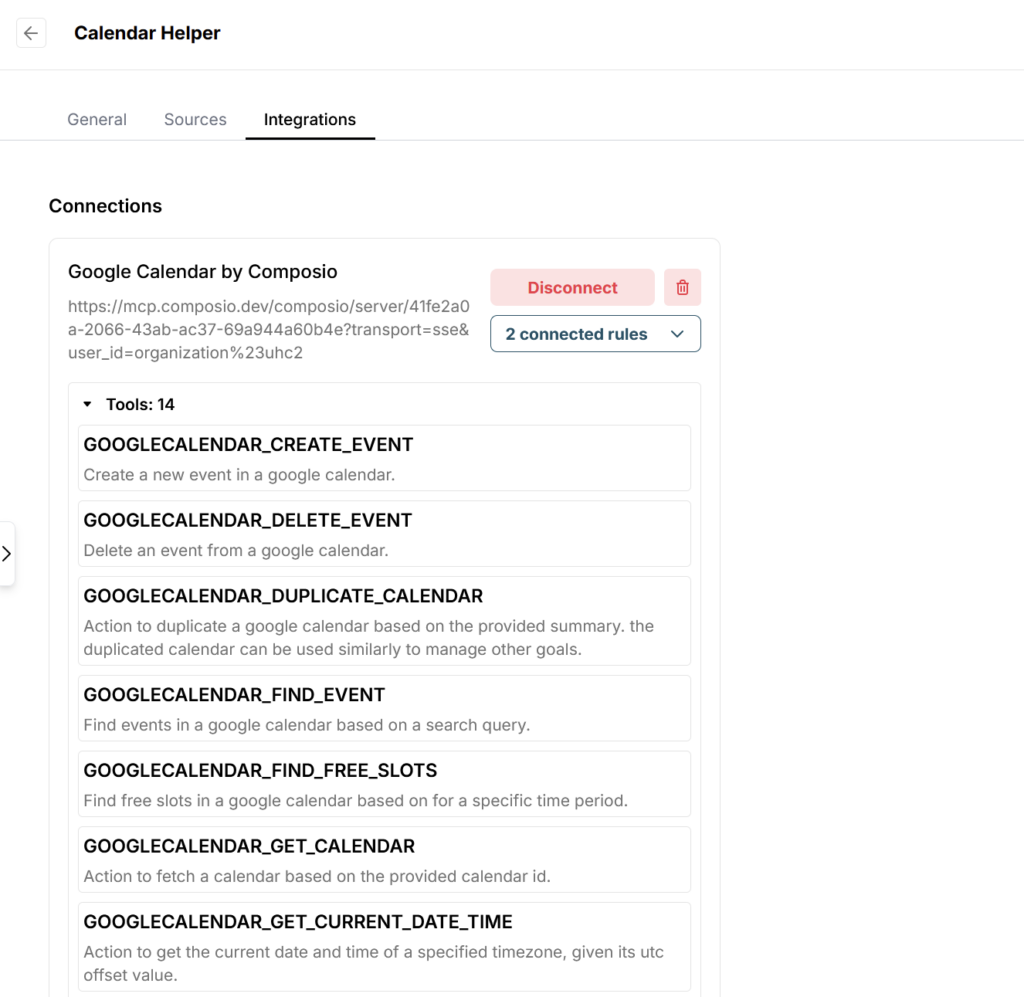
That’s it! Your calendar is now connected to your agent. After connecting, you’ll see the service tools (what it can do) and the connected rules (explained below).
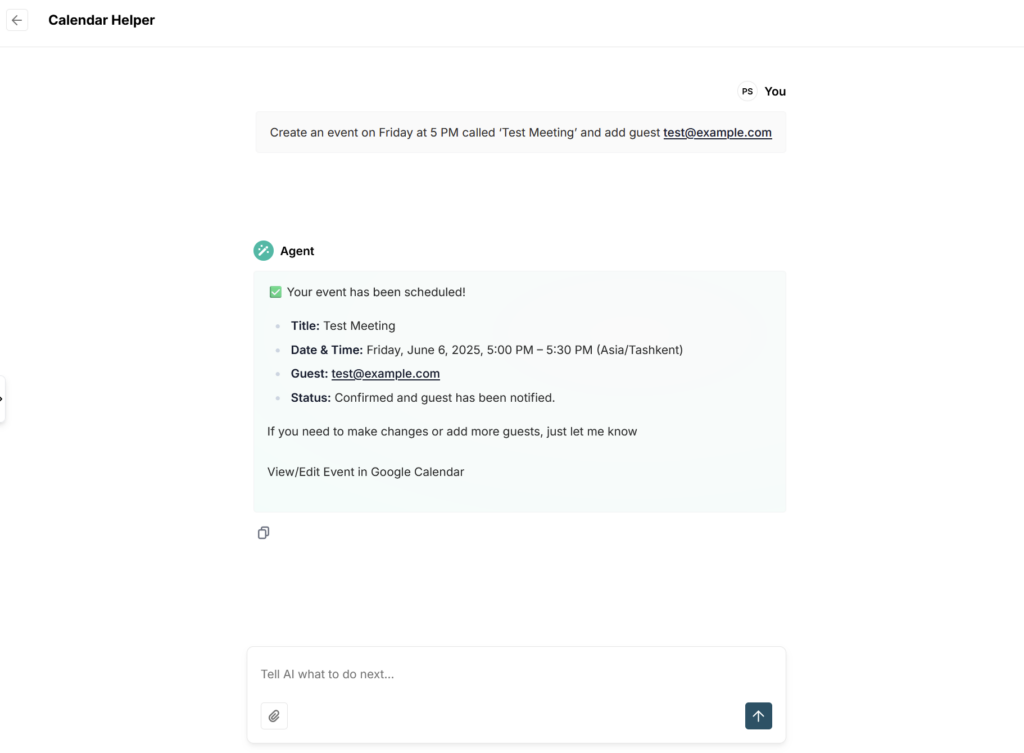
4) Now let’s try out our integration. It’s important to note that there’s no need to modify the prompt — everything will work as is.
Open your agent and try giving it a command, for example: “Give me a list of upcoming meetings.” Or: “Create an event on Friday at 5 PM called ‘Test Meeting’ and add guest test@example.com.”
Your agent will understand and carry out the task using the connected calendar.
That’s the simplest use case, but there are many more possibilities. For example, you can:
- Generate summaries of upcoming meetings
- Connect an integration with Apollo to fetch key data about your guests
- Create a task in Asana or Todoist
- Add a new item to an Airtable table
- Show key values from the latest deals in HubSpot
The potential use cases are vast – it all depends on how you want your agent to support your workflow.
Rules for MCP Integrations #
What Are Rules?
- Rules are smart instructions that guide how your agent interacts with third party services.
- They help standardize responses, automate workflows, and ensure consistency—without the need to repeat yourself.
How It Works
- You create a set of Rules for your integrations.
- Each Rule tells the agent how to handle specific tasks or formats when working with a service.
- Once set, these Rules are automatically applied whenever your agent uses that integration.
Examples of Rules:
- Use the UTC time zone for all Google Calendar events.
- Format pages in Markdown when creating documents in Dropbox Paper.
- Write emails in an official tone when sending via Gmail.
We also recommend using rules to more precisely specify the projects or databases you plan to work with. For example, you can create a separate rule for Asana and immediately specify the project ID, or if you’re working with Supabase, create a rule and specify the table ID. This will help speed up the agent’s performance and make it more accurate.
Why Use Rules?
- Save time by automating preferences and workflows.
- Ensure your team’s standards are always followed.
- Make your agent more predictable and reliable for everyone.
How to Add New Rules?
FuseBase makes it easy to manage rules. First, you create a custom set of rules, then apply it to the specific integration you need. For example, you can create one set of rules for calendar integrations, another for your CRM, and so on.
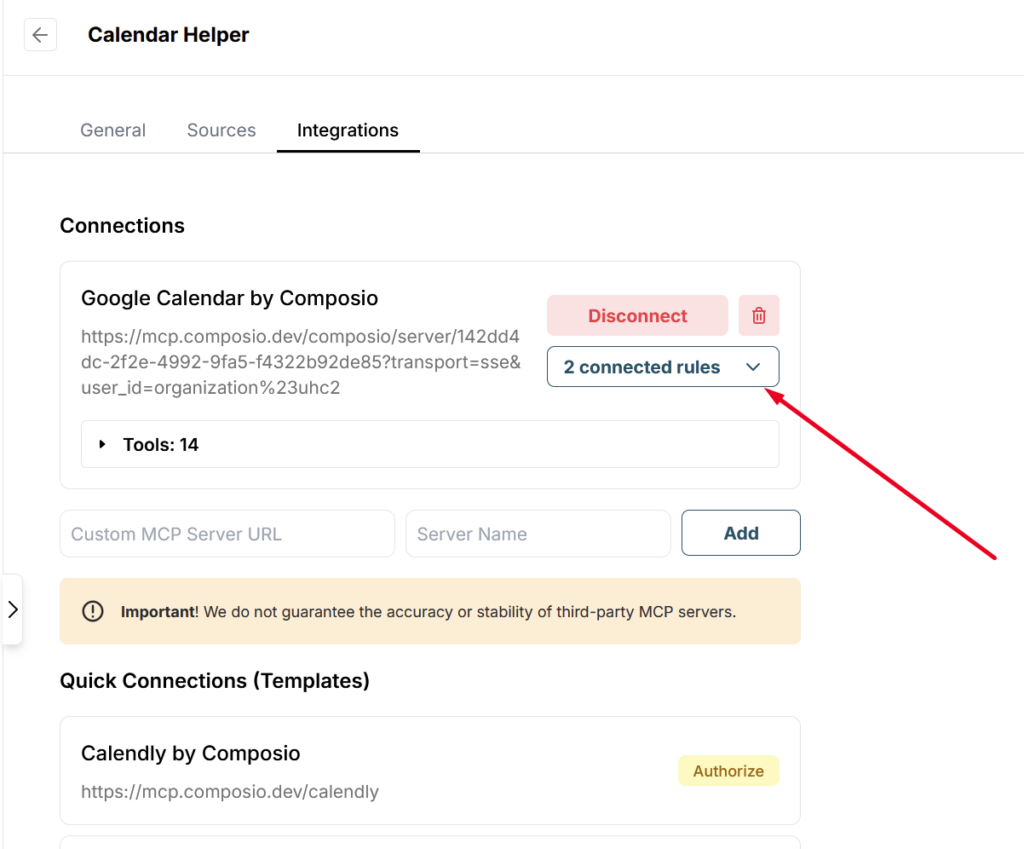
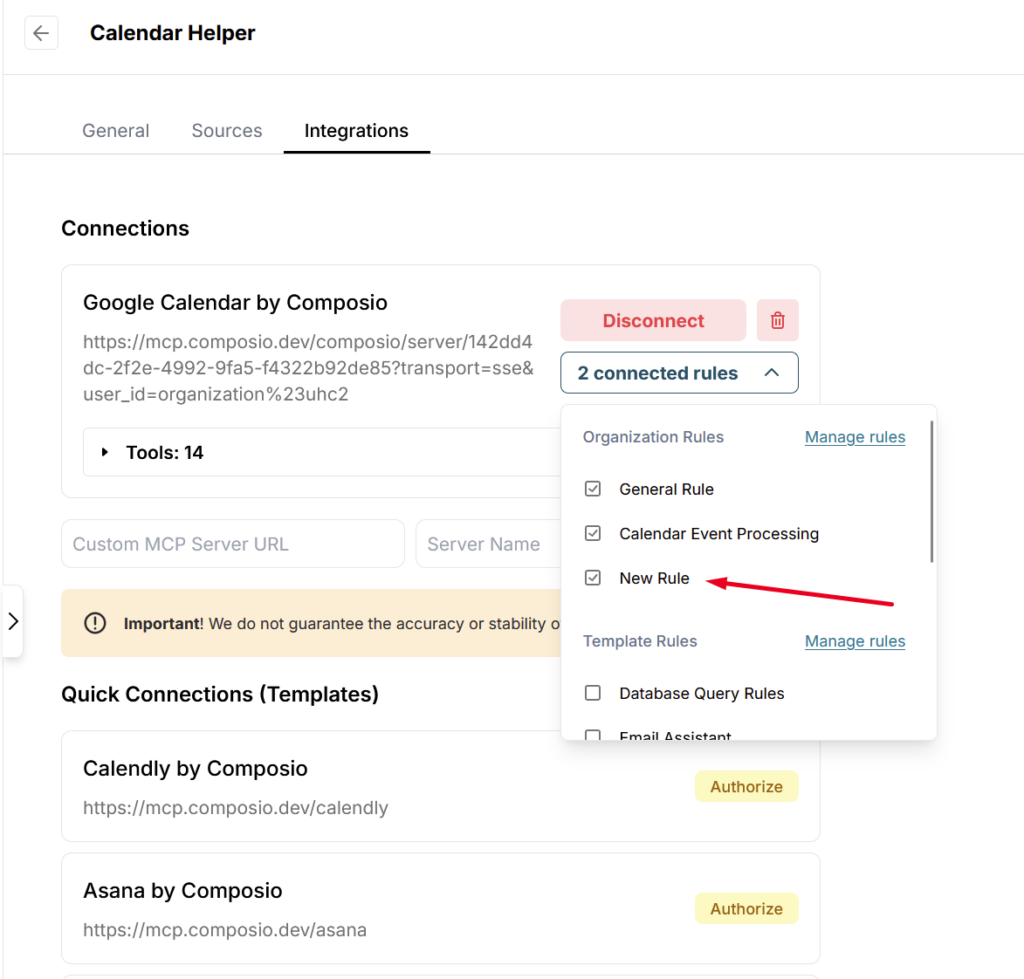
1) To do this, go to the Integrations section and click on Connected rules next to the integration you want to manage.
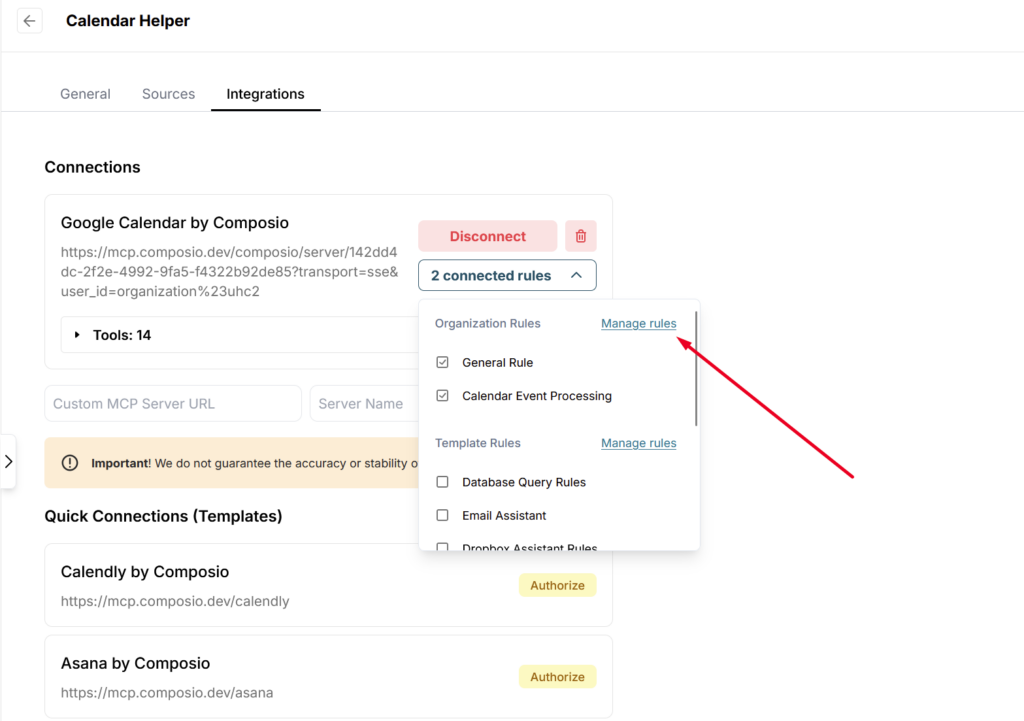
2) Next, click on Manage rules next to Organization rules. (Templates are predefined rule sets created by the FuseBase team, which you can also use).
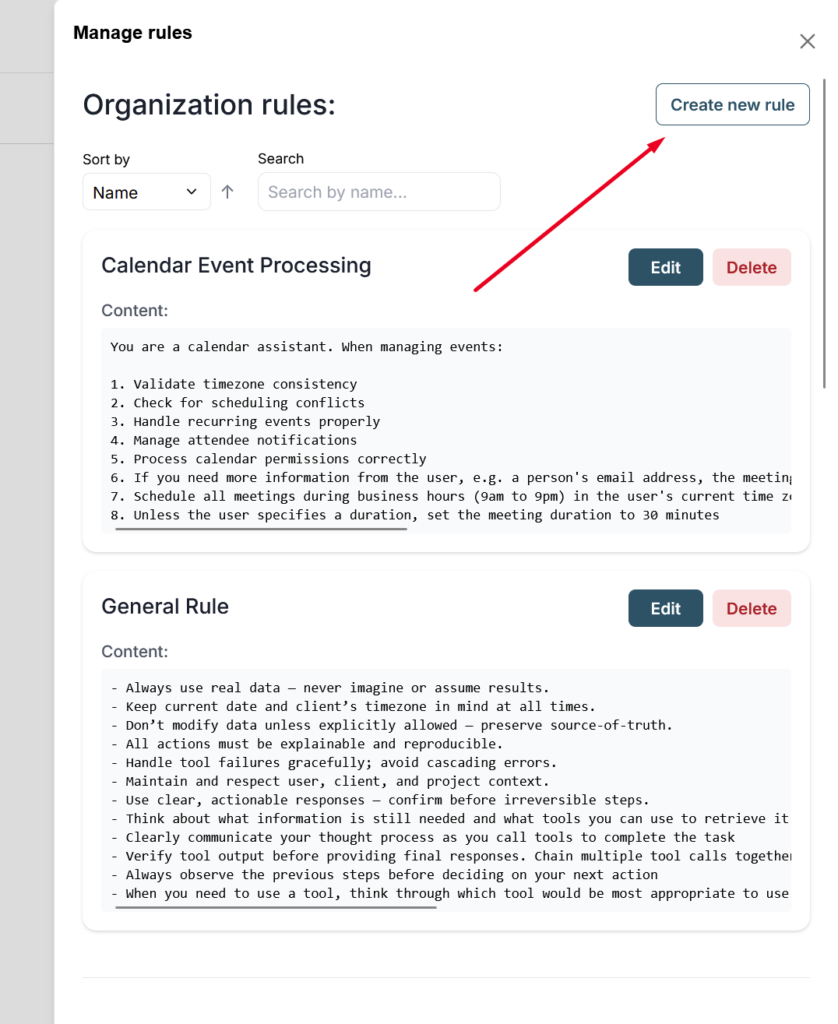
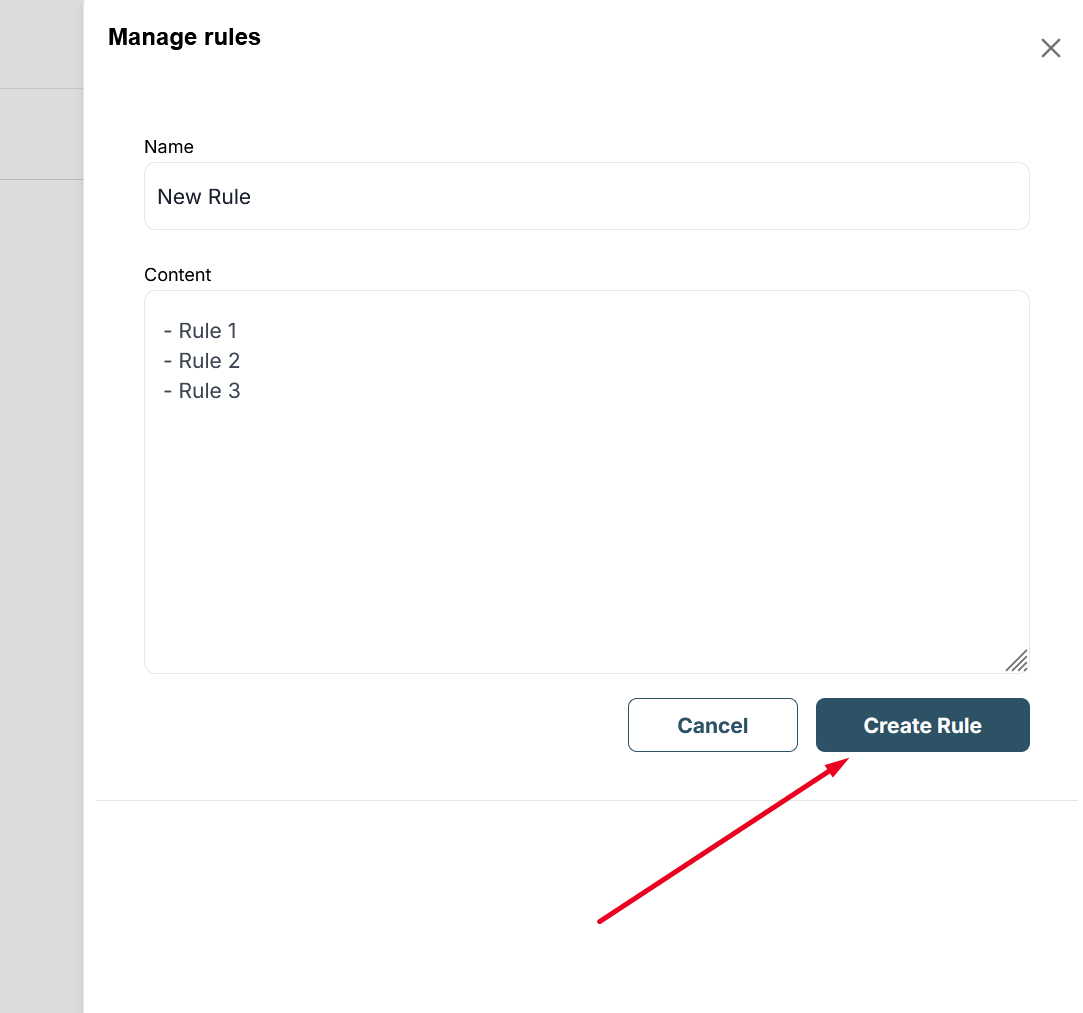
3) Click on Create new rule. Next, enter a name for your rule set and define the actual rules.
4) Then, save the rule set.
4) After that, click on Connected rules next to the integration you want to configure, and select the rule set you created. You can apply the same rule set to multiple integrations.
You can also edit existing rules. To do this, go to Manage rules and find the one you want to update. Then click Edit and modify the rule — for example, by adding new conditions.
Important: Any changes you make will automatically apply to all agents where the integration using this rule is active.
Connecting your own tool or integration #
In addition to the integrations we provide, you can also connect a third-party integration. Many services offer the ability to use their MCP servers. For example:
https://mcp.composio.dev
https://mcp.pipedream.com/
https://mcp.zapier.com/
https://www.activepieces.com/mcp/
and others.
It’s important to note that we cannot guarantee 100% stability of third-party MCP servers. However, this is the fastest and easiest way to connect thousands of integrations to your agents.
1) Now we’ll show you how to connect a third-party service integration using Composio.
2) Open the link https://mcp.composio.dev/
3) Log in or create a new account –

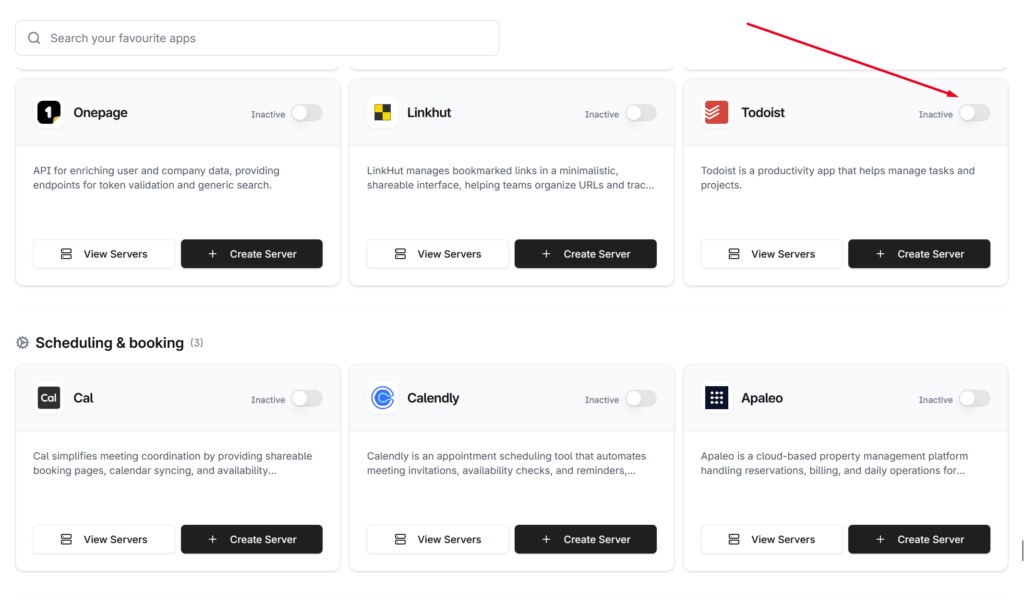
4) Then go to https://mcp.composio.dev/dashboard/apps
5) Find the app you need. For example, I want to quickly create tasks in Todoist through an agent. To do this, I find Todoist in the list of apps and click on “Activate”.
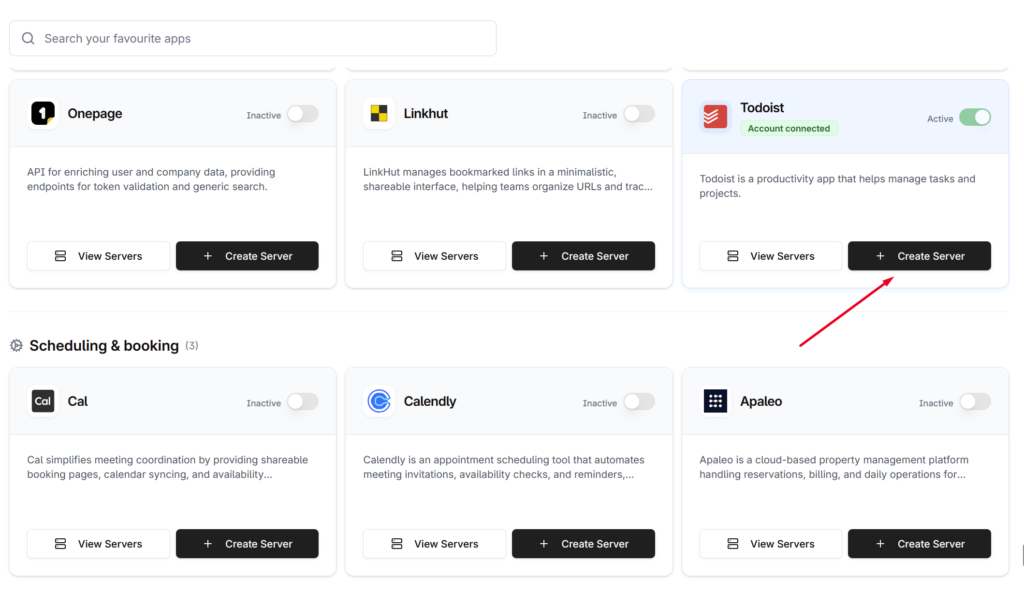
6) Next, grant Composio permission to access your Todoist. Don’t worry, it’s absolutely safe.
7) Then, click on Create server and enter its name.
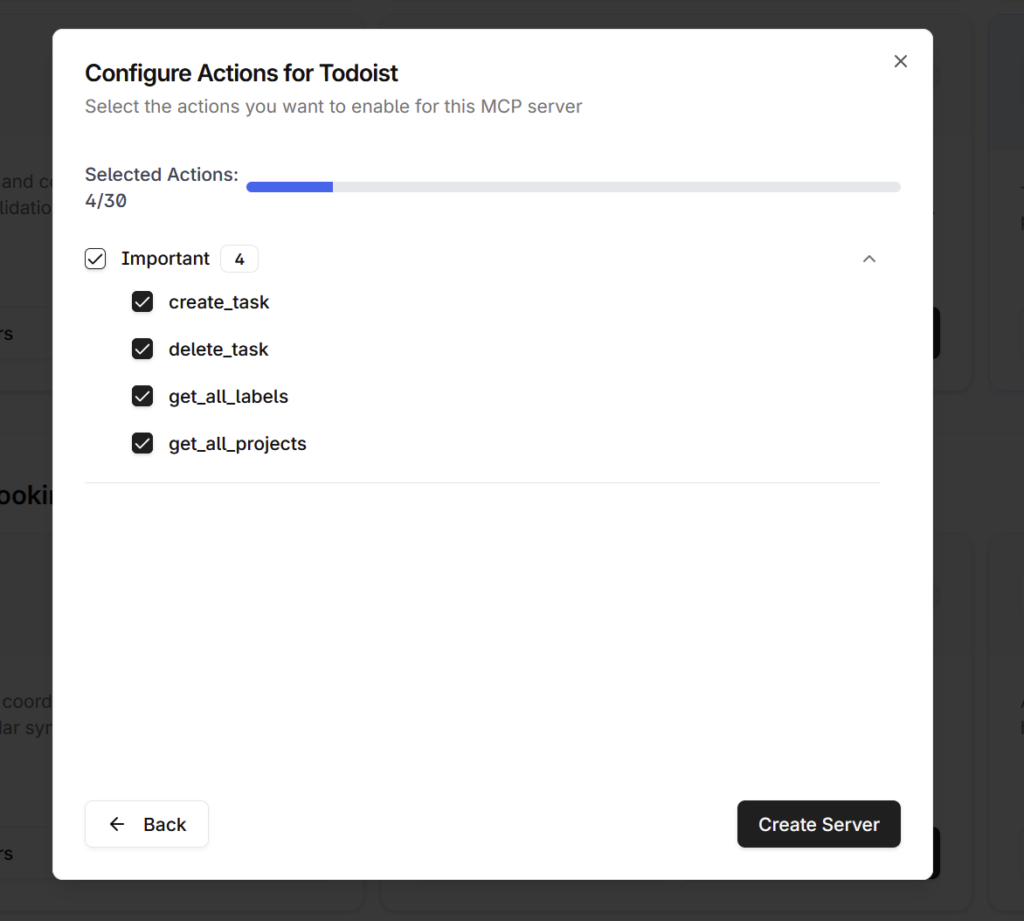
8) Next, specify which actions the agent is allowed to perform. For example, you can allow task creation but restrict task deletion. After making your selection, click on Create server.
9) Next, you will see a link to the MCP server that you need to copy.
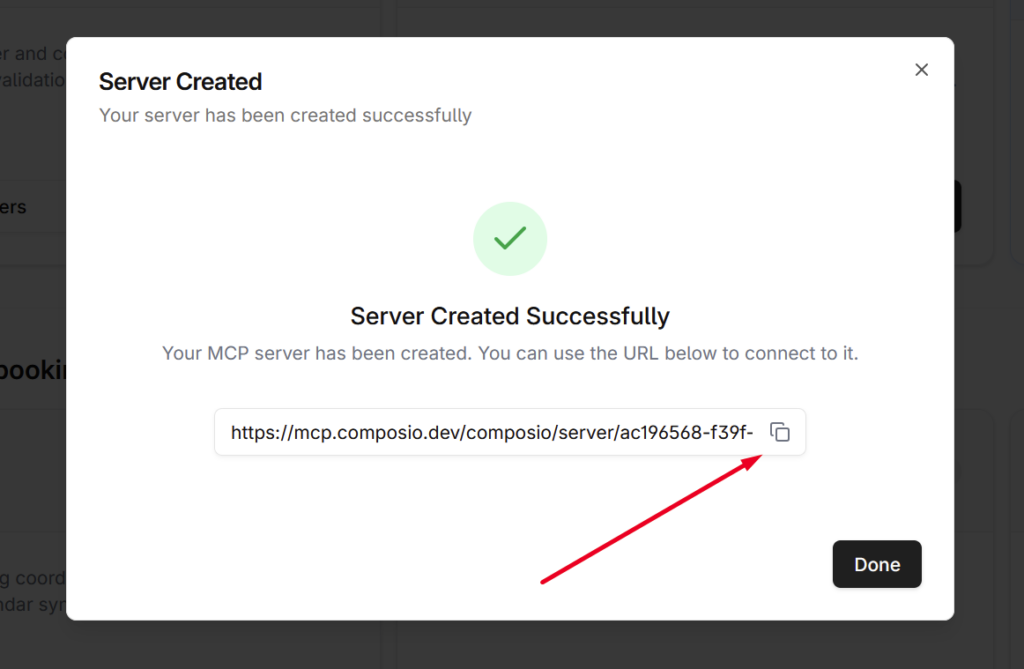
10) Next, you need to add the server link to your agent. To do this, open the settings of the agent you want, and go to the Integrations section.
Paste the MCP link and click Add.
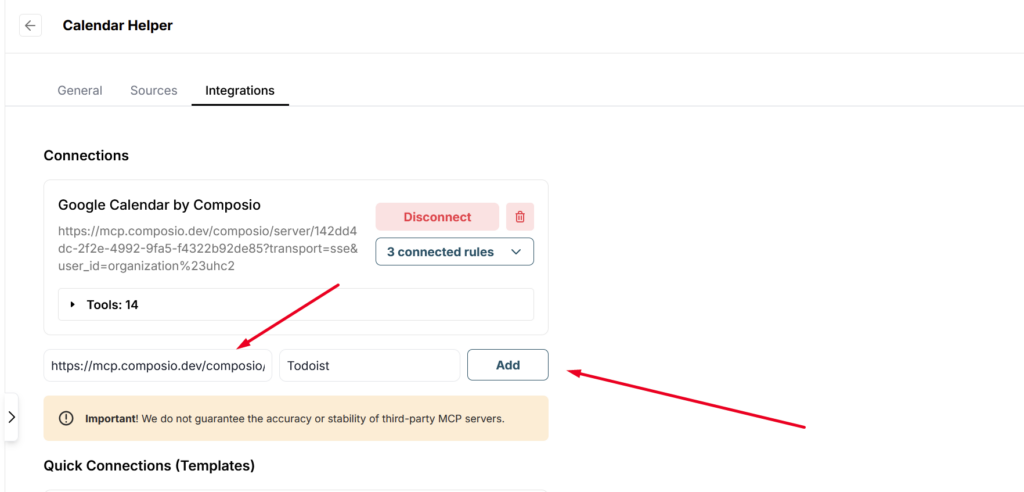
That’s it — your agent just got better with an additional integration. Now you can create tasks in Todoist or, for example, update them directly from the chat window.

Connecting integrations from other services works the same way. If you need any help with the integration, feel free to contact our support team at: https://thefusebase.com/support/